Pages

Thursday, August 29, 2013

DIY Dream Catcher

Dream catchers have been a part of native american culture for years.  They serve to protect people from negative dreams and spirits by trapping them in the web while still alowing the good dreams to slip through the hole in the center of the dream catcher and glide down the feathers to the sleeping person.  If you feel inspired to create one of these mystical guardians of peaceful sleep for yourself continue to read.

You will need:

  • The lid to an ice cream container
  • yarn in 1 or two colors
  • scissors
  • beads/ feathers
  • glue


Step 1:
           First you will need to punch the center of the ice cream lid out so that you are left with an inch wide ring.
Step 2: 
           Tie the end of your skien of yarn around the ring then begin two wrap it around the ring tightly so that you cover the ring in yarn.when you finish wrapping the yarn tie it off so that it creates a loop at the top for the dream catcher to hang from.
Step 3: tie a long new piece of yarn to the top of the loop so that you can begin to fill in the webbed part of the dream catcher.
Step 4: you will then begin to make loops all the way around the ring.  you will do this by pulling the yarn over the top part of the ring and around back through the gap left from where you tied it and where the loop was placed. do this all the way around the loop once, leaving the string in between the loops loose so that there are little 'swags' all the way around the loop.


 Step 5: 
            Now you are going to start the second row of the dream catcher.  Essentially you are going to be making the same kind of loop as the first row but you will be wrapping it around the center of each 'swag'. like so:


Step 6:          
           Next you will repeat step five so that you have gone around the loop approximately two more times. each time making your loops around the last rows swags.


Step 7:
            When you have filled in the webbed part of the dream catcher to your desired amount you can simply tie it in a know or string a bead on and tie it on the opposite string from where your last loop was.  Now you are going to add your beads and feather! you will do this by cutting pieces of yarn or embroidery floss about an inch longer than your finished length.  I chose to make three strands hang down each with a bead and a feather attached but it's really up to you.  I attached the feather by stringing a bead on to the strand, squirting a dot of glue inside the bead, and then pushing the end of the feather inside that bead as well. 

I hope that you enjoyed this tutorial! 
sweet dreams everyone!


Saturday, August 17, 2013

Wish Bracelets


These cute little bracelets are more than just a fun accessory... mingled with a bit of magic and whimsy the simple knotted bracelet allows your wishes to come true!
All you have to do is make a wish when tying the bracelet onto your wrist or ankle and leave it there until the bracelet comes untied or falls off in a few weeks and VIOLA your wish will come true! 


This is one of my favorite bracelets to make because it is so simple yet so fun. Here is how to make one of these little guys for yourself!
supplies:
               - Tape
               - Scissors
               - One color of Embroidery floss
               - 1 wish

step one:
               Measure out a piece of string that is an inch or two longer than you want your bracelet to be but do not cut the string yet.  what you are going to do is measure out a piece that is 5 times as long as the initial length. Then you will fold the string so that one side will be your ideal bracelet length and one side will be four times longer.
step two:
               Tie a knot in the top folded part of the string so that you have a loop at the top and the short string on one side and the long side and tape the top loop to a clear surface.
*From now on I will refer to the short side as the anchor string and the long side as the knotting string.*

Step three:
                  Now to tie the knot! the rest of this bracelet will consist of tying the same knot over and over again. this knot is done by making the strings look like a backwards number 4 by crossing the knotting thread under the anchor thread then pulling the end of the end of the knotting string around the anchor string and through the center of the  backwards '4'. then pull the knotting thread tight!


You will then repeat step three until the bracelet is your desired length or until you only have about an inch of anchor thread left exposed. As you repeat the knot you will start to see the spiral pattern of the bracelet.  I find that after every six to eight knots you will have to pull the knotting string underneath and around the anchor thread so that the knots will be able to continue the spiral pattern instead of a weird jammed squiggle thing.
Step four: 
               When your wish bracelet reaches its desired length you will simply tie off the two strings, and cut off the excess string while still leaving enough of the two strands to tie the bracelet to you wrist! WAH-LAH!


Tuesday, August 13, 2013

Introducing: The Happy Book

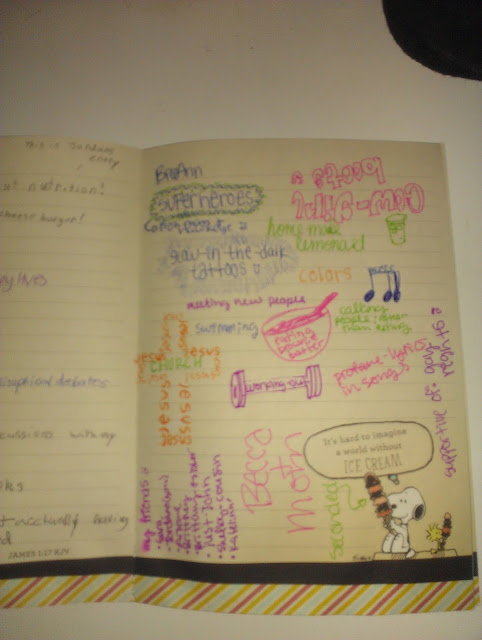
Well you see it all started when a dear friend of mine introduced me to a brilliant idea of hers.... A happy book!
Essentially the happy book is an accumulation of lists, paragraphs, doodles, and random interpretations of things that make me happy! My happy book has been especially fun because I take it everywhere with me and encourage my friends and family to pick a page and write about what makes them happy.  Overall my happy book serves as a reminder of all the great things life has to offer when I am feeling down.  Not to mention asking someone to write in a happy book is a great way to brighten someones day!


I would recommend having a happy book to anyone for any of the aforementioned reasons and many more.  I personally did not make my happy book because I stumbled across this little guy in a store and being the peanuts fanatic I am I couldn't pass it up. However I have made happy books for other friends in the past. creating a happy book can be as simple as labeling a composition book or going all out on decorating a unique journal. that's all up to you but regardless I will soon post a DIY of some creative ways to personalize notebooks and spirals.

Until next time folks!
(hooray for my first post)